Seamlessly Fuse with React Native New Version: Bridging the Gap!
A fundamental factor that impelled React Native to its broad recognition is its capacity to lay out a unified platform bridging JavaScript and Native languages. One of the significant contributors to React Native’s vigorous performance lies in its broad assortment of reusable libraries custom-made for both Android and iOS platforms. To foster a production-grade application, bridling the force of Native Bridge becomes fundamental. We will dive further into these techniques for a clearer understanding.
Creation of the LightApp
To get a proper understanding of the React Native for Android Module, it is time for us to create a simple LightApp example with the help of react-native CLI.
$ react-native init LightApp
$ cd LightApp
Here, we are going to create class Bulb in Swift for Java and iOS for Android, and hence this React Native 0.59 app is going to be a React component. This is the best cross-platform example and you can see that the same React code would work in both React Native for Android and React Native for iOS.
We can segregate the project into two types:
Native Bridge in React Native for iOS
We are going to focus entirely on iOS. This is to create a bridge between Objective C and React components. It consists of three steps:
Step 1: You can create your own Bulb class along with Bridge Header
Step 2: Understand the GCD Queue and fix the regular warning
Step 3: Access all the variables in JavaScript from Callbacks and Swift
Step 1) You need to create a Bulb class and Bridge Header
We will go about creating a Bulb class in swift in the case of React native 0.59. That is going to have access to a static class variable is along with more than one function. After this, we will be able to access this swift class right from Javascript. Let’s open LightApp.xcodeproj file in ios folder. You should be able to open Xcode along with your ios code. When you can open the particular project with the help of Xcode, you can create a very new Swift file called Bulb.swift as shown:
Here you can see that we have gone on to click on Create Bridging Header. This will immediately create a new file LightApp-Bridging-Header.h This will help to communicate between Swift and Objective C code. Remember that in a project we have only one Bridge Header file. So if we add new files, we can reuse this file. Update following code in LightApp-Bridging-Header.hfile: #import “React/RCTBridgeModule.h” RCTBridgeModule is here to provide everyone with a better interface where you can register your bridge module. Next update Bulb.swiftwith the following code: import Foundation @objc(Bulb) class Bulb: NSObject { @objc static var isOn = false @objc func turnOn() { Bulb.isOn = true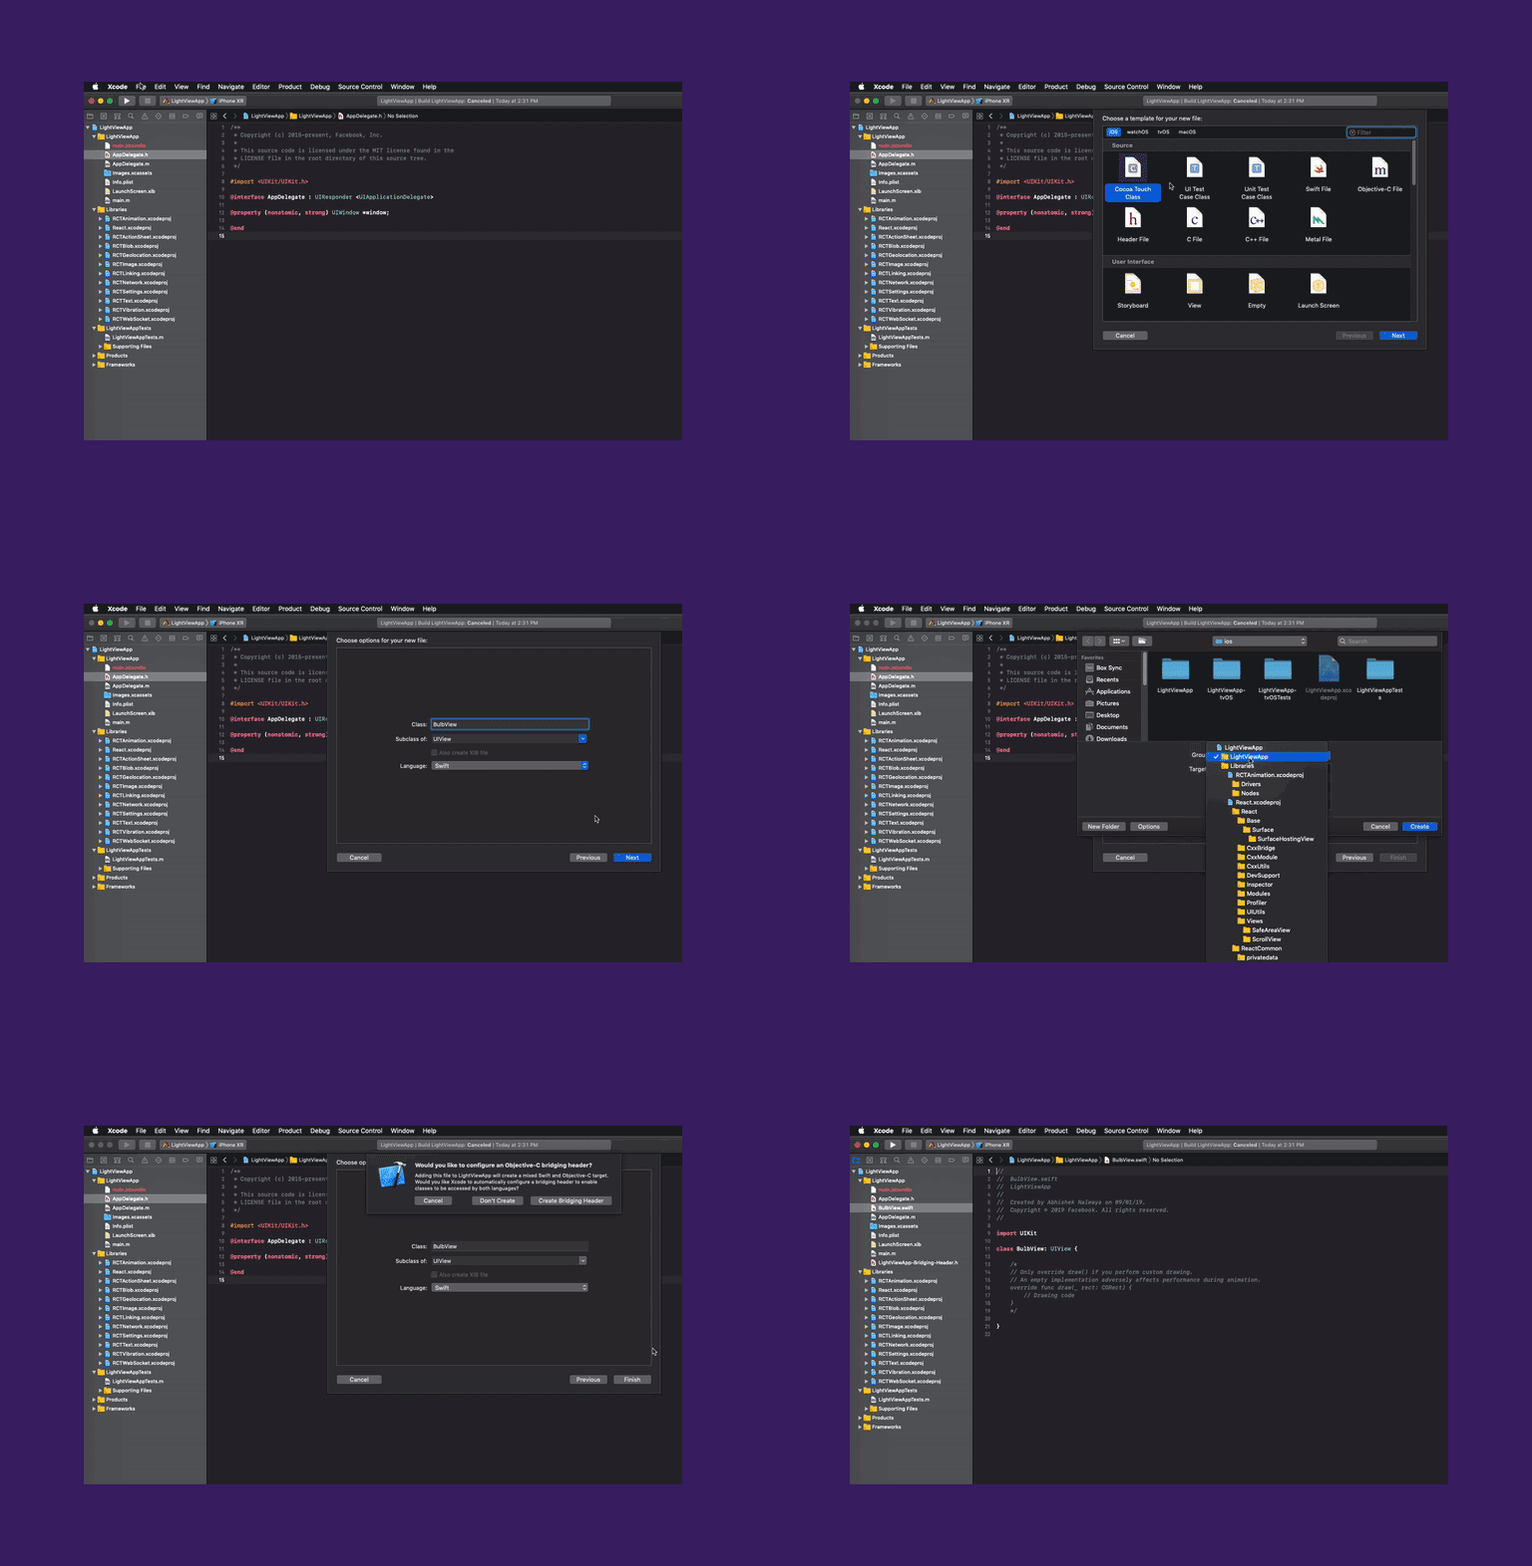
print(“Bulb is now ON”)
}
}
We have went on to create Bulb class that has been inherited directly from your NSObject. You can notice that the root class of the majority of the Objective-C class hierarchies is going to be NSObject. This is from here that every subclass would inherit your basic interface to your runtime system. This also has a better ability to behave in the form of Objective-C objects.
We could notice the usage of @objc before your class and function. This would go on to make the object or function available to Objective C The @objc attribute makes your Swift API available in Objective-C and the Objective-C runtime. This is how you create your new file from File -> New -> File Make sure to select the Objective-C file. You can name your file as Bulb.m as well as update the following code:
#import “React/RCTBridgeModule.h”
@interface RCT_EXTERN_MODULE(Bulb, NSObject)
RCT_EXTERN_METHOD(turnOn)
@end
React Native is not going to expose any of the functions belonging to Bulb to React JavaScript unless it is explicitly handled. To accomplish that, we have made use of RCT_EXPORT_METHOD() macro. So we have exposed Bulb class and turnOn function to our Javascript code. Since we convert Swift object to a javascript object, there is a type of conversation. RCT_EXPORT_METHOD supports all standard JSON object types:
- BOOL to boolean
- NSInteger, float, double, CGFloat, NSNumber to number
- NSArray to array
- NSString to the particular string
- NSDictionary to object with the help of string keys along with the values belonging to any type right from the list
- RCTResponseSenderBlock to function
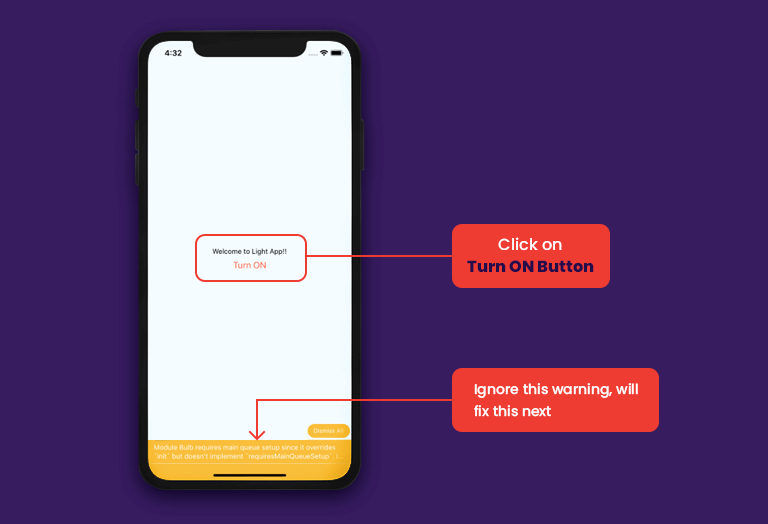
It’s time for us to update all the JavaScript code. You can also access the Bulb class from all the React components. You just have to go on and open App.js along with the update with the help of this code:
import React, {Component} from ‘react’;
import {StyleSheet, Text, View, NativeModules, Button} from ‘react-native’;
export default class App extends Component{
turnOn = () => {
NativeModules.Bulb.turnOn();
}
render() {
return (
<View style={styles.container}>
<Text style={styles.welcome}>Welcome to Light App!!</Text>
<Button
onPress={this.turnOn}
title=”Turn ON ”
color=”#FF6347″ />
</View>
);
}
}
const styles = StyleSheet.create({
container: {
flex: 1,
justifyContent: ‘center’,
alignItems: ‘center’,
backgroundColor: ‘#F5FCFF’,
},
});
Now you need to run this iOS simulator:
It is time for you to open the Xcode console when you want to see all the logs. We can also notice that we call the Swift turnOn method from the particular JavaScript code.
Revolutionary Upgrades: Disruptive Dependency Changes in your React Native New Version
When you go about upgrading your app, right from React Native new version 0.57 to 0.60, this can go on and cause a considerable amount of pain and effort. The major problem with upgrading lies in the app dependencies in the form of native modules. Many tools such as React Native Upgrade can simplify everything for you.
Even though the upgrading takes a long time, the dependencies should be maintained well. It is found that when the dependencies are less, the output will be much better. You just need to decide if the upgrade is really worth it. You can go on and check the changelog. The major reason to upgrade is the breaking change of dependency. You might not be using it directly but it can be through your particular module. If the module is not fine, things might be a bit challenging.
Upgrade it regularly
You should start upgrading the react native app in an isolated environment. This way, you are not going to mess up with your stable code. This is a common practice when you just start upgrading recently.
Get a Clean Environment
Upgrading all the npm modules to your newest versions is not suggested right away. That would result in many more issues. You should also not forget any kind of post-install scripts that your project might have. This is the best way through which you can fix all the issues in the node_modules by changing the specific file when the installation takes place. Sometimes, all you need is a clean build environment. When you don’t use a Docker, you might need these for a clean environment
./gradlew clean # cleans Android build folders
rm -rf node_modules; yarn # delete and reinstall the node modules
rm -rf ios/Pods # clean CocoaPods folder
yarn start –reset-cache # start react-native bundler with a clean cache
When everything is uploaded, you can start your native build process.
After the up-gradation process gets over
Once you finish the process of upgrading, you need to ensure that there is no bug in the code.
Pattem Digital: Your React Native App Development Companion for Success
It is always suggested to upgrade your React Native app regularly. This will allow you to stand as per the trends. You would always be ahead of the competition. By leveraging the step by step process such as creating lightmap and breaking change of dependency, we would always be on the right track.
1. How to upgrade an app on the basis of the Expo SDK?
If your app is composed of features built with the help of Expo SDK, then updation wouldn’t be a problem. Once people update expo, they have to leverage create-react-native-app for setting up the repository. Every package script in package.json should be changed from react-native-scripts in relation to expo. The best react native mobile development company can help you with this.
2. Upgrading apps without custom native code
The upgrade path is depending on the Expo app or people who have gone on to create their entire repository with the help of react-native init. They have also tweaked their native code in a better manner. This just means that you have used the JavaScript files belonging to the app. You wouldn’t have integrated any kind of third-party plugins containing native files. In this case, upgrading should be more straightforward. This method should be used for version 0.58 or anything before that. Right from version 0.59 forward, the upgradation method is on the basis of rn-diff-purge.
This will make the process much easier for you. You can take a look at the package.json You have got to update your React Native dependency based on your new target, e.g.”react-native”: “0.58.0” You have got to update every third-party library dependencies along with it. If this consists of linked native code (ie. react-native-maps), then you have to use upgrade path three along with your repository. This will contain native code changes Run the npm install as well as understand dependency based on React, e.g. react-native@0.58.0 requires a peer of react@16.6.3 but none is installed.
Update the React dependency to the new target as well, e.g. “react”: “16.6.3” Run the entire npm install again. Now run a react-native upgrade. It is going to help you with overwriting Make sure to run the post-upgrade steps mentioned above to prevent any errors resulting from outdated caches This is the moment of truth: run react-native run-ios and react-native run-android to see if everything still works as expected.
3. Upgrading apps with custom native code
If you know that the app has reached an exhaustion state, then you need to upgrade your app with the help of custom native code. If your app version is on 0.59+, then it can run on the new upgrade command with the guidance of a react-native upgrade. It is on the basis of rn-diff-purge. It should also automatically run based on the three-way merge.
you’re on version 0.59+ of React Native and can run the new upgrade command using react-native upgrade which is based on rn-diff-purge and should run an automatic three-way merge. If everything goes well, you’ll end up with no conflicts. If any of the diffs result in a conflict, you’ll have to resolve them manually and commit the changes.
This is the method used to upgrade path two
Check the package.json
Update the details of React Native dependency based on your new target, e.g.
“react-native”: “0.58.0”
Update every third-party library dependencies. If these are going to consist of linked native code, then you have got to upgrade your Podfile too.
Run your npm install and get to know the React dependency.
Update your React dependency to your new target
Run your npm install the next time
Check the code difference between your target version and the origin. Check the overall level of feasibility
Run your cd ios && pod repo update && pod install when you want to reinstall any of your existing CocoaPods dependencies.
Run the commands react-native run-ios and react-native run-android to ensure that everything is going on well.
Common problems in React native app development services during upgradation.
While it’s impossible to cover all the issues you might run into, I thought it might be useful to cover the most common ones that I’ve seen.
Upgrading to React Native 0.56
There might be issues such as the Babel 7 update. This is how you reset your Babel 7 update:
npm install -D metro-react-native-babel-preset
… and babel.config.js is configured accordingly to make use of it:
module.exports = {
presets: [“module:metro-react-native-babel-preset”]
}
Upgrading to React Native 0.57
You have got to upgrade React as well as react-test-renderer to version “16.6.3”, as noted in the release notes. Any top-notch company can help as your React Native app development company and React native mobile development company.
Empower Your Business with Pattem Digital for React Native Expertise
If you have any concerns regarding React Native overhauls or require top-notch React Native app development services, look no further than Pattem Digital. Our aptitude in React Native mobile development permits us to offer extensive support custom fitted to your requirements. Reach us today for any help you require in building React native development services of any sort.
